RCCN WeChat QrCode
 Mobile WebSite
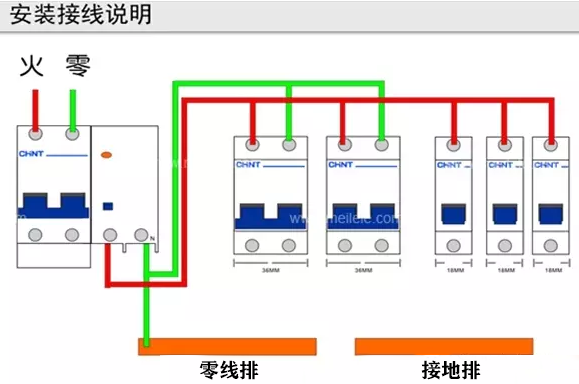 Through the leakage circuit breaker, we understand how important leakage is to personal safety. When we see the wiring diagram of the leakage circuit breaker again, we will also know how much this way brings us. The main function of the leakage circuit breaker is that when a person has a leakage or an electric shock, the device of the leakage circuit breaker will immediately cut off the power supply to ensure people's safety and prevent electric shock. In addition, there are some leakage circuit breaker wiring diagrams, and some other equipment is also installed, so that the leakage circuit breaker has both short circuit and overload functions.
When the leakage switch is connected, connect the upper line and the lower line. Pay attention to the position of the phase line (commonly known as the fire line) and the neutral line. Do not connect the wrong mark. Look at the mark on the switch. If there is no mark, connect the line to the left and the line to the right. It is important to note that the neutral wire taken by the electrical equipment cannot be taken from the upper end of the leakage switch, and part of it is taken from the lower end of the leakage switch. If this is done, the leakage switch will not close. To put it another way, if you use the phase line that passes through the leakage switch, you must use the zero line that passes through the leakage switch. The power-operated leakage switch is lightly pressed by the above test button, and the leakage switch should be tripped immediately, and then pressed once a month to confirm that the leakage protection function of the leakage switch is effective. Note: Pressing the test button frequently during power-on will affect the service life of the switch. The leakage circuit breaker is divided into single-phase line and three-phase line. Single-phase wiring is divided into four groups of wiring methods and multiple groups of wiring methods. See what you said is completely correct. As for your use of the C60 leakage circuit breaker, you can fully meet your above electrical use. C60 rated current range: 1A-63A. P = UI = 220V * 63A = 13860W. The total power of all the appliances above you will not exceed the rated power of the leakage circuit breaker, so the use is safe.